At first glance, all door access readers may seem similar, and it can be hard to know what differentiates the various systems you see on the market. Factors such as how they are connected to the access control system (either on-premise in the IT room, or through the cloud) via wireless or wired connection (or not at all) can help you to figure out which solution is best for your needs. Additionally, another factor is power supply - either they are battery powered, low voltage connected, or "power over ethernet" (PoE) - more on that below.
You can think of readers in four different categories:
- Standalone proximity readers
- Wireless proximity readers
- Proximity readers
- IP and PoE readers
Let's explore the reader types in more detail.
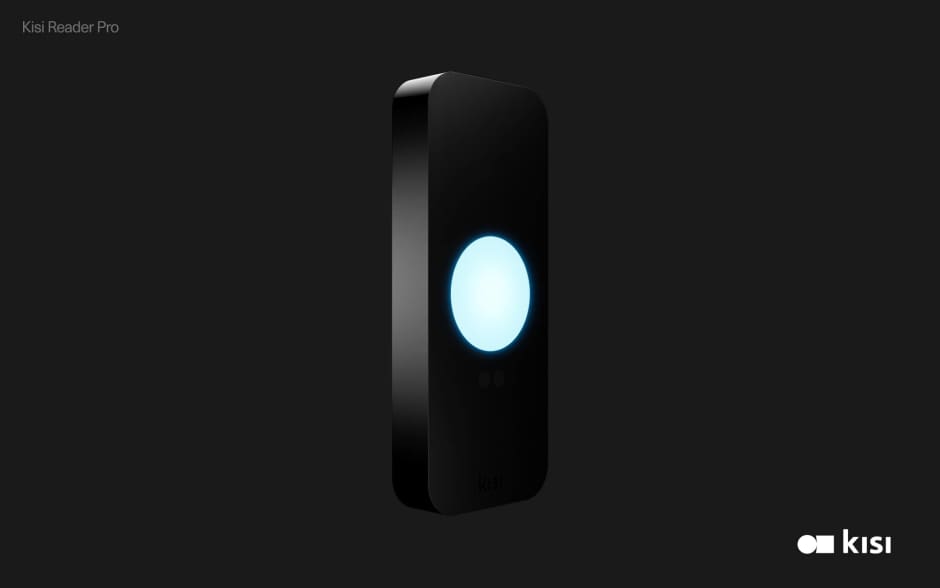
Reader types #
Standalone proximity readers #
These readers are typically connected to power, but have no data connection. They are typically installed by a local locksmith for a one-off type of installation scenario.
Standalone proximity readers do not have a central control panel, meaning changing permissions and access must be carried out on each individual device.
Sometimes these readers are called "panel free" because they are fully installed in a decentralized way. Think about it like programming a PIN code for each individual person on each individual reader - it's a great option for very small "quick fix" kind of installations, but will generally increase the complexity of management. To test and activate every card you’ll have to go to each and every reader. Also, you cannot control access in real time, but need to deactivate the card on each reader. That's why they often come with PIN pads.
For larger organizations or those that want more centralized control and easier management, we would recommend an alternative solution, such as implementing IP readers, that would better allow you to remotely manage access.
Wireless proximity readers #
These readers are most commonly used by hotels to avoid wiring all doors to a central location. They typically operate on battery power and are connected to a wireless repeater.
These wireless readers are not wired to power but are battery-operated, and do not require a wired data connection. Typically, in the hallways, you might see some small access points made by the same brand as the wireless readers - and sometimes the locks themselves. That's how the locks connect to an online environment. Via RF (radio frequency), they communicate on a power-saving protocol to this access point, which is connected to the internet itself. That way, you don't have to physically connect each lock but, at the same time, have real-time updated information.
Proximity readers #
Reading RFID, Bluetooth (BLE), or NFC formats connected through a data protocol directly to the access control panel.
Proximity readers, commonly called "prox readers," are the most frequently used type of reader in commercial environments. They are universally compatible with access control systems, since they typically communicate on a protocol invented around 1974, named "Wiegand Protocol". Conforming to the lowest possible standard comes with the problem that those prox readers are susceptible to vulnerabilities. We recommend choosing a solution like Kisi, which is continually updated to current security standards, allowing you additional peace of mind.
Proximity readers are a great "default" for standard environments. However, they lack more advanced options which allow for scalability, security, and future readiness. For advanced functionalities, like mobile access, easily upgrade your existing access system to the cloud.
IP readers (IP-Connected Proximity Readers) #
This is a more modern reader type which can be integrated into IT systems.

Currently the most advanced version of readers - due to their IP connectivity, they can be fully integrated into IT environments. Also data traffic to and from those readers can be controlled and secured more easily. Think about the installation as similar to any CCTV camera.
IP readers are future-proof, manageable at scale, compatible with integration, and secure.
IP readers are great for security because there is no direct connection between the reader and the panel. That means the line cannot be intercepted or tampered with, since everything has to run through your firewall on the switches first before talking to the other device.
Upgrading proximity readers with Kisi #
Proximity readers, such as the HID multiCLASS series, are often used in commercial environments and are compatible with many access control systems. While they are a great default for standard environments, they lack more advanced features that ensure extra security and future-proofing.
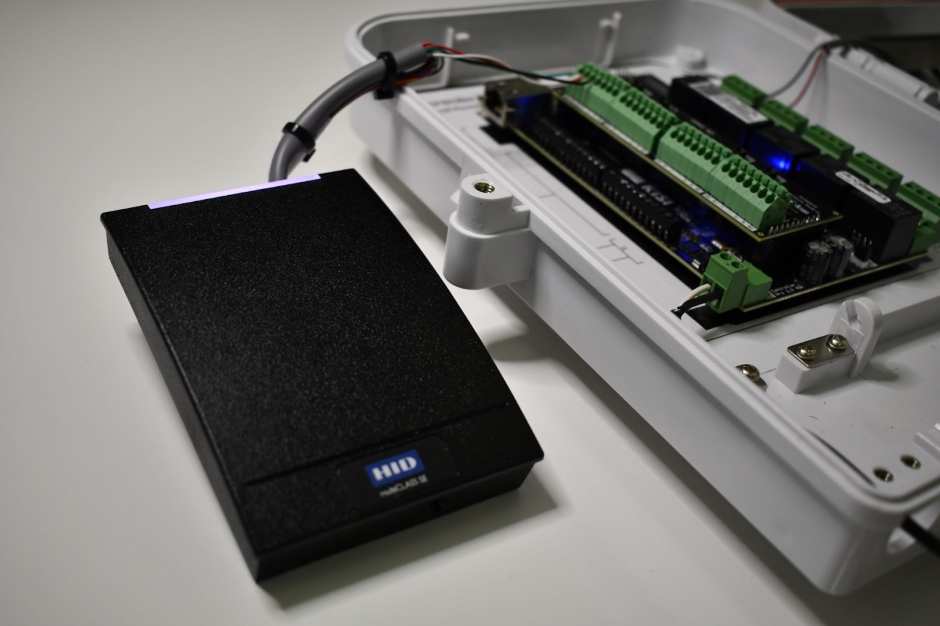
Thanks to Kisi’s Wiegand board, you can upgrade your existing proximity readers and take advantage of the benefits of cloud-based access. Some of the many functionalities include centralized and remote access management, remote unlocks through the mobile app, creating unlock and access schedules, and activity monitoring with real-time analytics.
Additionally, you can continue using legacy credentials with your proximity readers, giving extra flexibility to unlock methods. Whether it’s for a small office or a larger multi-tenant building, Kisi enhances legacy systems and proximity readers for increased security.
Watch the video below for detailed info on integrating proximity readers with Kisi, the benefits, use cases, and installation tips.
Installation - Connecting your proximity reader to Kisi #
To upgrade your existing proximity reader, you’ll need:
- Kisi Controller Pro 2 with Wiegand board installed
- Proximity reader, such as the HID multiCLASS
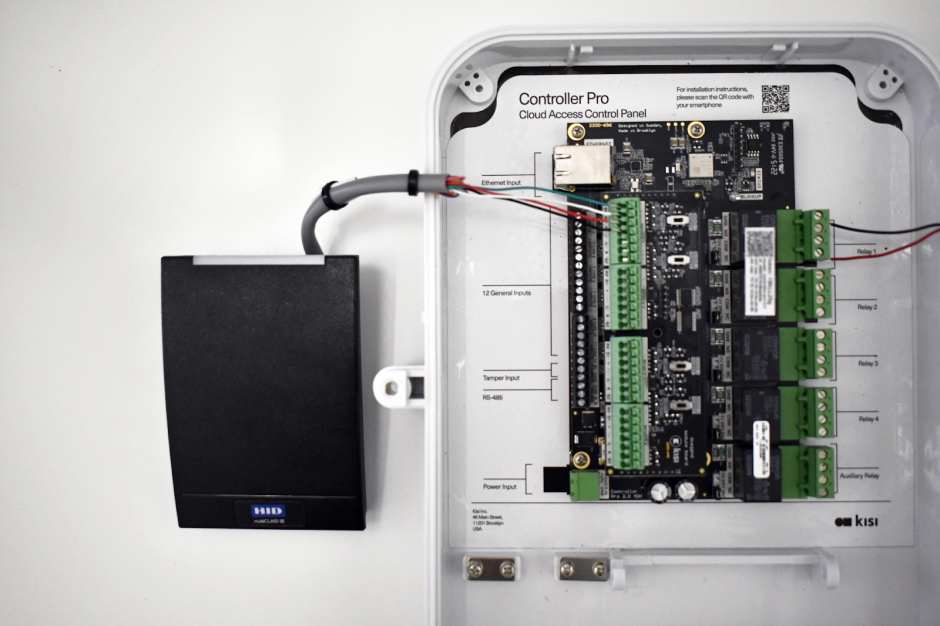
Hardware: Wiring the proximity reader to the Kisi Controller Pro 2 #
- Unplug power from the Kisi Controller Pro 2 for safety.
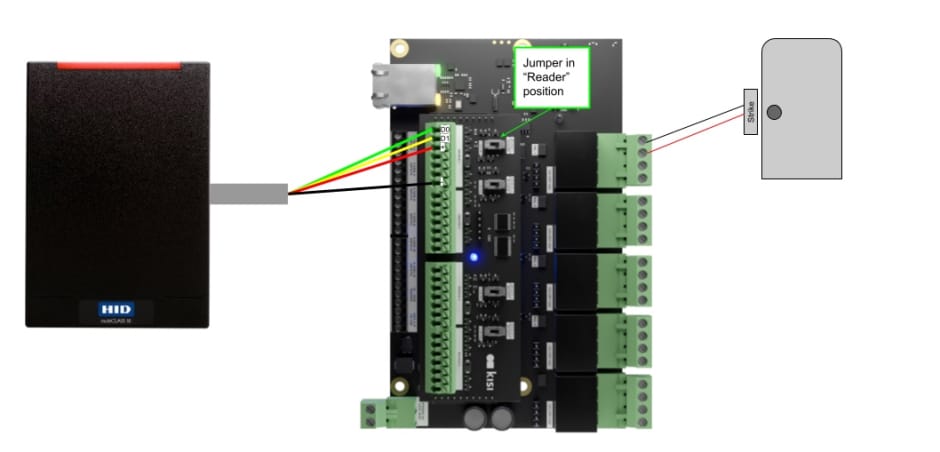
- Read the datasheet for the proximity reader and take note of what wire color corresponds to Data line 0, Data line 1, +Voltage, and Ground.
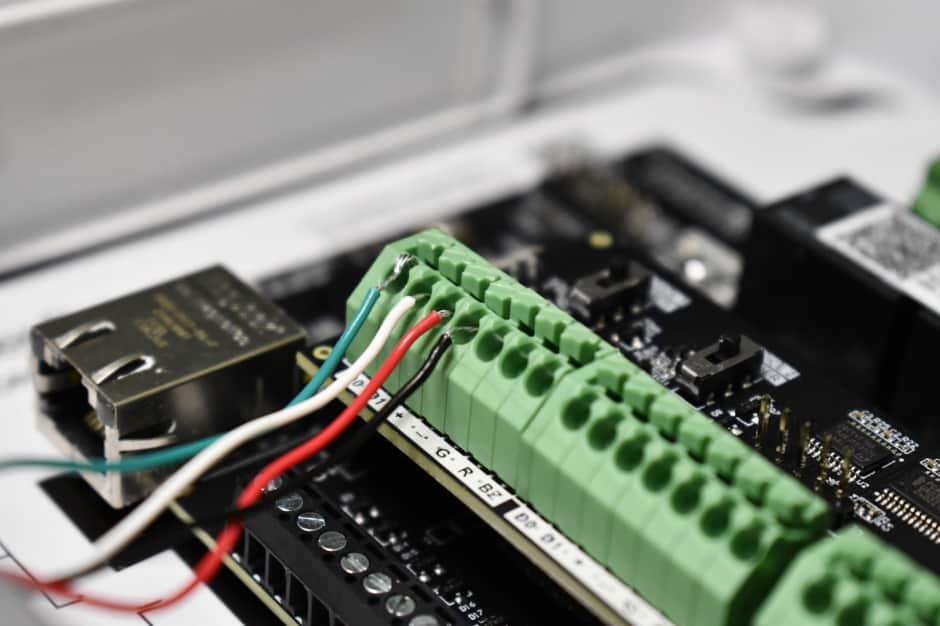
- On the Kisi Controller Pro 2, locate the four Wiegand device channels on the Wiegand board.
- Select one Wiegand channel for the proximity reader and locate the seven ports on it.
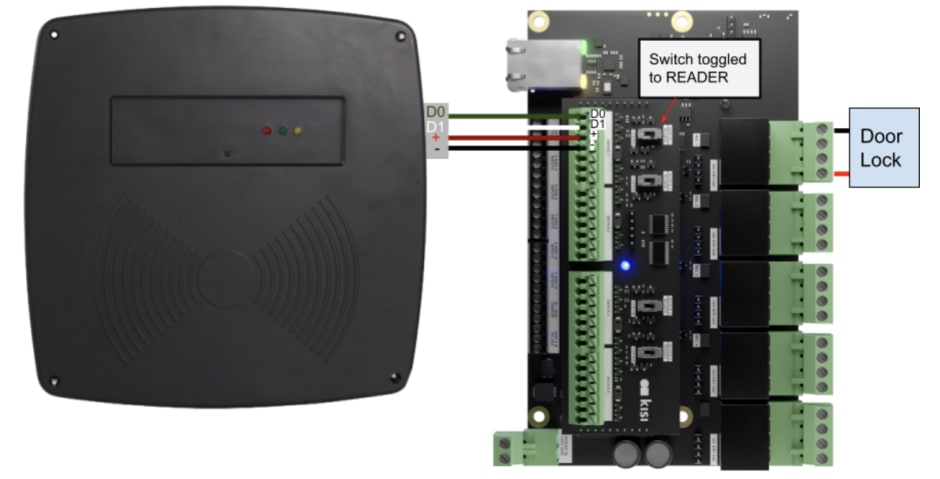
- Wire the D0 port on the Wiegand board to the D0 wire on the proximity reader (Data line 0).
- Wire the D1 port on the Wiegand board to the D1 wire on the proximity reader (Data line 1).
- Wire the + port on the Wiegand board to the + wire on the proximity reader (12 volts direct current).
- Wire the - port on the Wiegand board to the - wire on the proximity reader (Ground).
- Toggle the switch on the Wiegand board to 'Reader'.
- For further functionality, you can wire the following pins: G: Green LED, R: Red LED, and BZ: Buzzer.
- Verify that all connections are secure and there are no loose wires before repowering.
Software: Setting up the proximity reader #
- Go to web.kisi.io.
- Click on ‘Places’ and select your place.
- Click on ‘Hardware’, ‘Controllers’, and select your controller.
- Scroll down and select the Wiegand channel that corresponds to the proximity reader connected to the system.
- Click on ‘Type’ and select ‘Legacy Reader’.
- Click on ‘Search doors or elevators’ and select the door to unlock with the proximity reader.
- Click ‘Save’.
Software: Assigning legacy credentials #
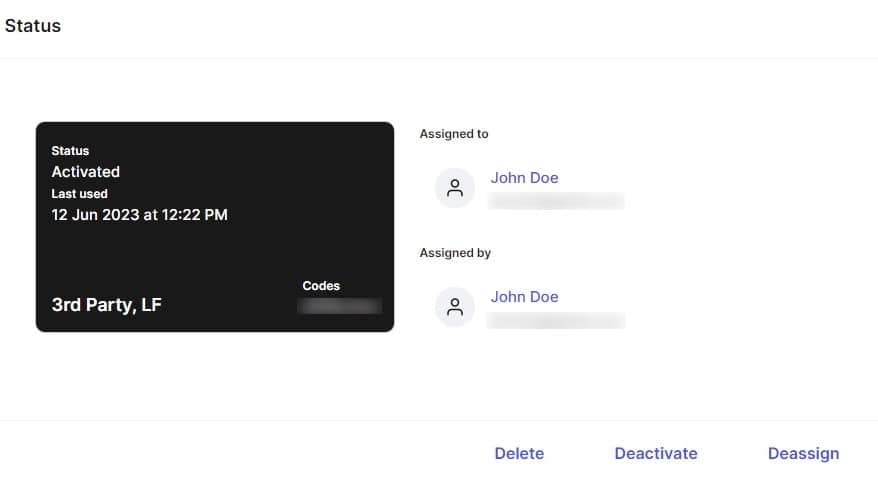
- Go to web.kisi.io.
- Click on ‘Credentials’, ‘Add Credentials’, ‘Single Credential’.
- Click on ‘At Reader’.
- Click on ‘Search place’ and select your place.
- Click on ‘Search door’ and select the door the proximity reader is connected to.
- Click on ‘Card Type’ and select which type your credential is. If you do not know, click ‘Unknown’.
- Bring the credential to the proximity reader and wait for the web dashboard to finish searching for the scanned credential.
- Click on ‘Assign to user’ and type the email of the user who will use this credential.
- Click ‘Assign’ to finish assigning the credential.
- Click ‘Activate’.
Long range readers #
Long range readers are devices that can detect and communicate with access credentials from a greater distance compared to traditional proximity readers. They use technologies like radio frequency identification (RFID) to wirelessly identify and capture data, enabling applications like parking systems, toll collection, and perimeter security.
For instance, parking systems often use long range readers to enable vehicle access control. Since these readers can detect tags or stickers from a distance, drivers can conveniently enter and exit parking facilities without needing tickets or proximity cards. Another common use case is in toll collection systems, since they can identify vehicles with RFID transponders and automatically charge toll fees without needing the vehicle to stop, preventing traffic and congestion.
How to connect your long range reader to Kisi #
With their extended range, long range readers offer enhanced convenience and improved efficiency in many scenarios. Thanks to Kisi’s Wiegand board, you can upgrade long range readers to the cloud to enable smart capabilities like centralized and remote management, video surveillance integration, and analytics.
Watch the video below for detailed info on integrating long range readers with Kisi, the benefits, use cases, and installation tips.
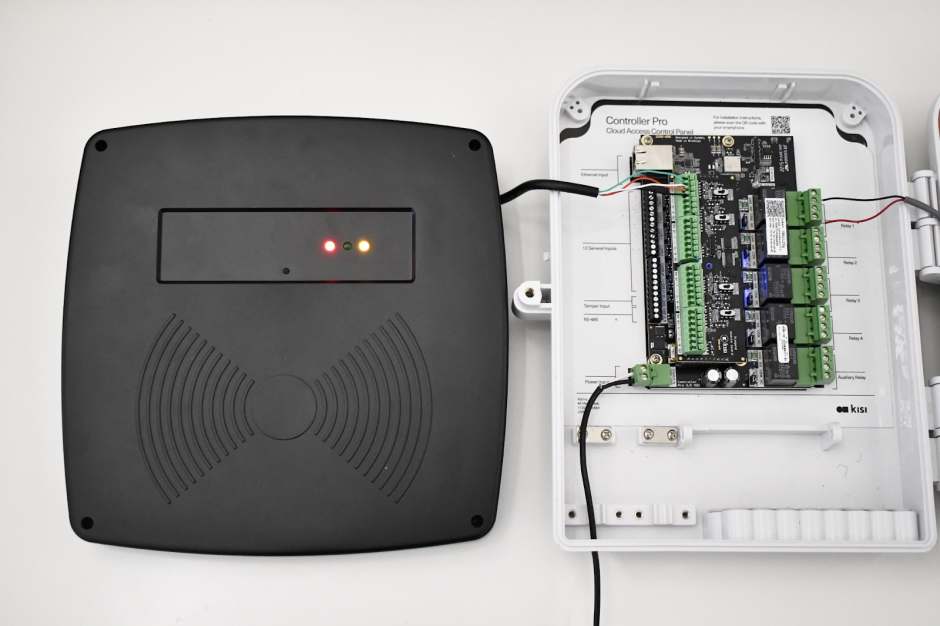
The long range reader is a type of proximity reader, which means you can follow the same hardware and software installation steps we listed above.
Take a look at the pictures below to see what the final wiring should look like.
How do proximity readers work with other components? #

Many construction and architecture companies ask us how to incorporate and specify electric door hardware into their project. It is important to think about more than just the reader. Below are some of the hardware products to consider covered in this overview:
- Card readers / Proximity readers
- Controllers
- Magnetic and mortise locks
- Doors
- Safety devices
When to specify electric door hardware #
For a construction company, the best phase to start looking at this is when drafting the plans. Typically, wiring or cable runs need to be indicated during this phase. Once the walls are closed, you can still install hardware, but cables need to be pulled when the walls are open.
The other critical part is specifying the doors. Consider forgoing sliding doors where possible, because they mostly do not work with electric door hardware and can limit your ability to implement proper security.
At Kisi, we have particular requirements for certain building plans because improper construction specifications can slow down an installation, and we like to help construction teams meet their project deadlines. Here are the ideal construction-related installation requirements for Kisi or electronic door hardware in general:
Using the floor plan for planning access control #
Typically the architect or engineering consultant draws a schematic of the wiring plan, including wire runs, where they are dispatched to, and any hardware installed.
Door planning is particularly important. In the past, it has helped many companies to visualize the plans with the specific picture of the existing door. This helps to save time during the installation process, as everything is already mapped out.
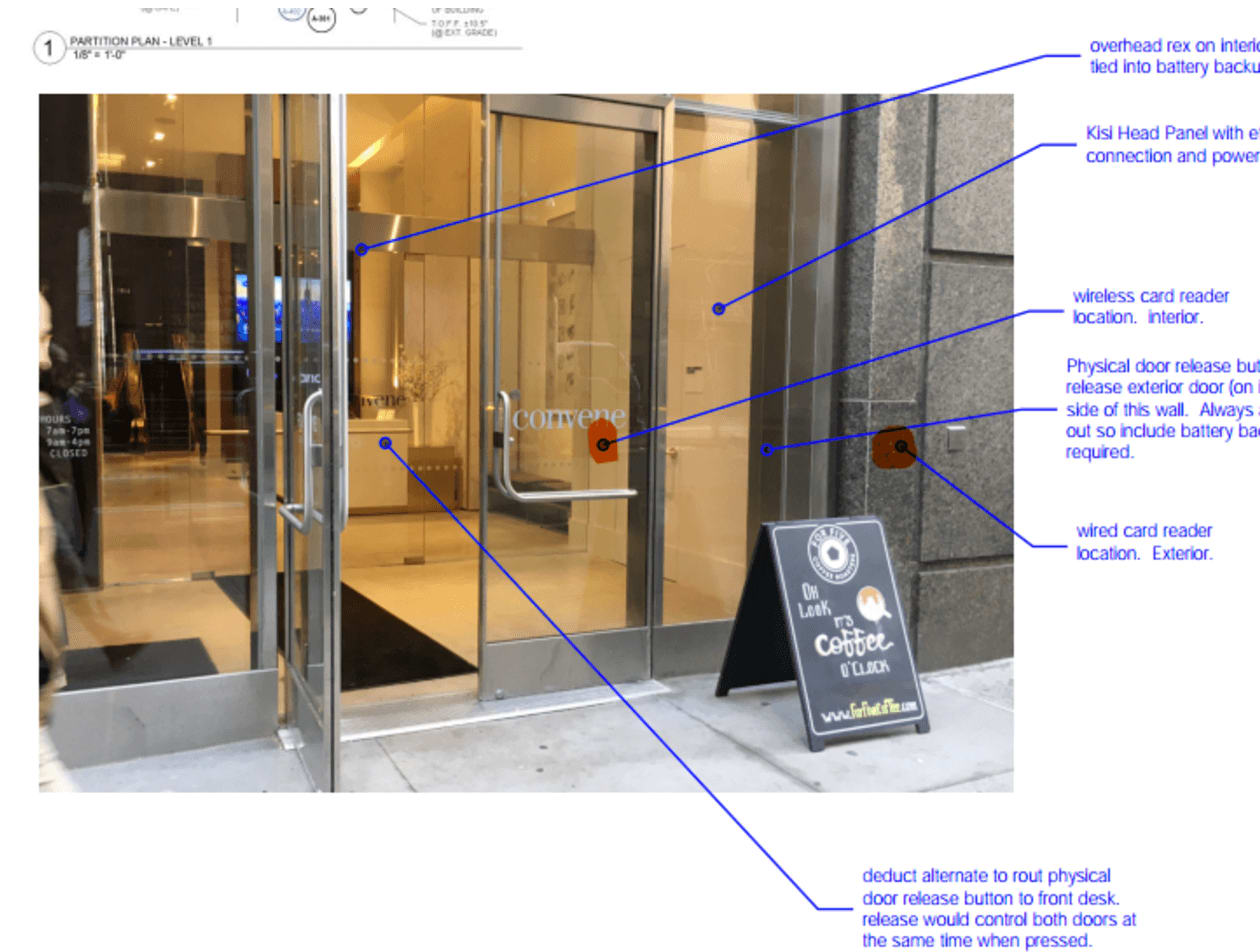
Specify electric door hardware (locks) to use for swipe card reader compatibility #
Any wired lock, like an electric strike, wired mortise lock, or electromagnetic lock, should work and can be included in the construction scope. Take a look at this comparison to understand the difference between smart locks and commercial-grade access control systems.
Whatever lock you end up choosing, one cable needs to be dispatched to the lock position. This cable will connect the door security hardware and the motion sensor or push to exit (if required). That’s why we typically recommend pulling CAT5e or CAT6 cable compared to regular low-voltage cable.
We also have a wiring diagram ready in our installation guide. Generally, you might look for wiring diagrams for electric door hardware, which are included in the document.
Advise on other locks
As previously noted, sliding doors are not recommended. They may look elegant, but are absolutely not usable with wired electronic locks, and thus limit your security.
Generally, all locks are wired to a power source. Typically the power source is in the IT – or communications room. However, if it’s a small one-door installation, you could also wire the lock to a power source close to the door. Keep in mind this shouldn’t be accessible for the regular user, otherwise you might end up with manual interference.
Specifying the swipe card reader (proximity reader) #
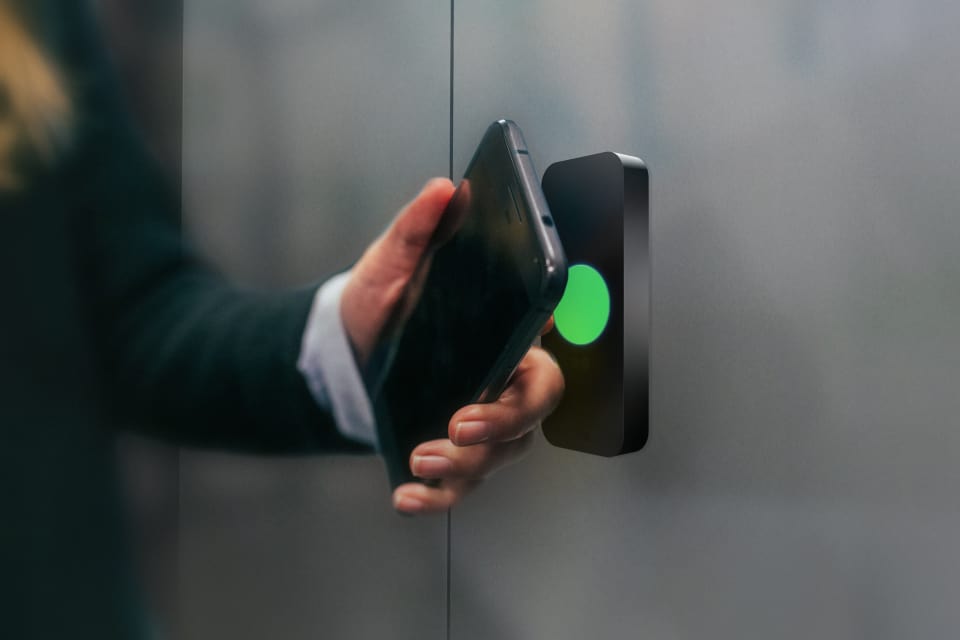
Kisi's state-of-the-art card reader is our Reader Pro. For ease of understanding, we stick with the industry standard “swipe card reader”.
The first question we typically get is about mounting specs.
Mounting specs of the reader device
A Kisi swipe card reader is wall mounted. The Kisi readers come with set screws to mount. The reader cable needs to be dispatched to the reader height next to the door 48” from the floor, with a minimum distance of 10” from the door frame.
Cable pulls for card readers
The Kisi Reader Pro works best with a wired CAT5e or CAT6 cable pulled from the future position of the swipe card reader to the IT room. Which CAT cable it is doesn’t really matter to us. Your cabling company might have preferences depending on quality and distance.
Placement
The reader must be installed outside the door on the same side as the door handle. For example, if the door handle is to the left of the door, the reader must be installed to the left of the door.
Cabling is not cheap and it shouldn’t be the place where you save, because most likely you will never be able to change or edit the cable runs during your entire stay in the office.
Important to note: the beginning and end of the cable must be labeled with the door name, so that there is no confusion as to which cable to choose.
Another option most companies prefer to have is a front desk wire, or a hardwired unlock button at the front desk. In this case, there needs to be a signal cable run to the front desk from the IT room.
Installing access control panels in the server / IT room #
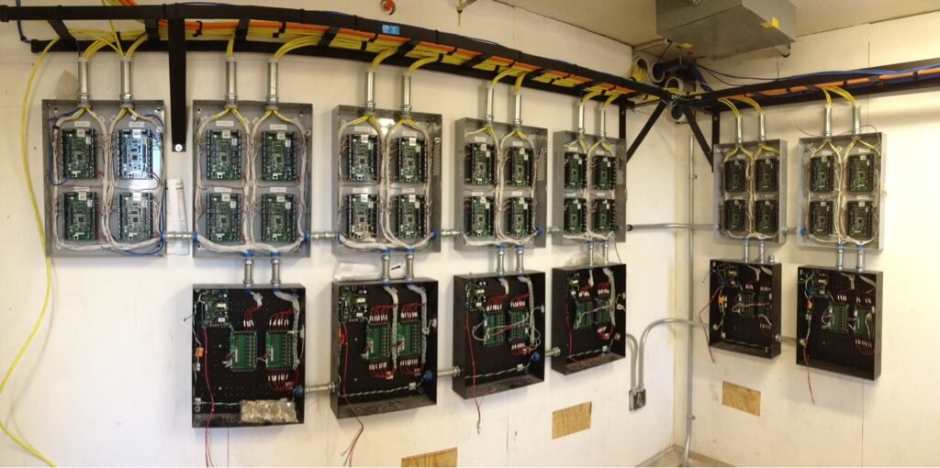
Ideally, Kisi controllers are mounted on a wall mount wood board at a height of 5 to 6 feet above the ground. There need to be 2 power outlets for each Kisi controller.
All wiring must be secured to the wall with a staple gun or wire tie-downs. Ideal compatibility would be a drop ceiling.
The Pro Controller needs an ethernet CAT5e or CAT6 cable for data connectivity, a twisted pair power cable, and enough space for running up to four door signal cables, as well as alarm panels. Also, in the case that backup power is needed, the installation should accommodate for this.
Power and functionality backup #
It can be difficult to plan for the failover power backup systems. Our first advice is always to check if the building has a backup generator for power. That saves all the trouble. Otherwise, for emergency requirements you would need a 24h backup battery, complimentary for the amount of locks you have.
Typically, the battery brand that is most recommended is Altronix.
For functionality backup, a physical analog backup must be installed in the form of a manual key override or pin pad.
Connecting fire safety and fire alarm to access control #
The fire safety system can be connected with Kisi via dry contacts normally open or normally closed. The fire vendor / architect has to specify emergency push bars where needed. A typical brand used for fire / emergency panels is Bosch.
Conclusion #
A card or mobile reader represents only one component of an access control system. While it is important to look at the specs of the hardware, it is equally important to understand the value that the system can provide as a whole. Learn more about the benefits of cloud-based access control systems.

